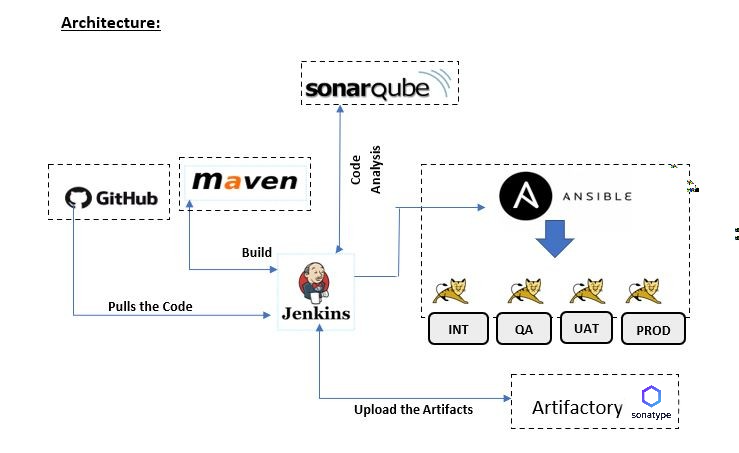
It is software development approach where all the components of an application are built, deployed, and managed as a single Unit . this approach can have its benefits, such as being simpler to develop and deploy.

Tools Used in this project are :
- Git: a version control system used to manage and track changes to the source code.
- Maven: a build automation tool used to manage dependencies and build the application.
- Jenkins: a continuous integration and continuous delivery (CI/CD) tool used to automate the build and deployment process.
- SonarQube: a code quality and security analysis tool used to identify and fix issues in the source code.
- Sona type Nexus: a repository manager used to store and manage artifacts such as JAR files and dependencies.
- Tomcat: a web server used to deploy and run the monolithic application.
- Ansible: a configuration management tool used to automate the deployment and configuration of the application and infrastructure.
Automated Code or Scripts Used:
- Jenkins file
- Ansible Deployment playbooks
- Sonar-project-properties
Continuous Integrations and Continuous Deployment :
- Git with Jenkins
- SonarQube with Jenkins
- Nexus with Jenkins
- Tomcat with Jenkins
Plugins in Jenkins :
- The SonarQube Scanner : plugin helps us maintain code quality by integrating the SonarQube tool into our pipeline. With this plugin, we can easily check our code for various metrics like code coverage, complexity, and duplications. This makes it easier to maintain high-quality code.
- The Nexus Artifact Uploader : plugin allows us to upload our build artifacts to a Nexus repository manager. This plugin automates the process of uploading our artifacts to Nexus, which makes it easier for us to share our build artifacts with others. This is particularly useful for larger teams that are working on multiple projects at once.
- The Nexus Platform : plugin integrates Jenkins with Nexus Lifecycle, a tool that helps us manage risks associated with our software supply chain. This plugin makes it easier for us to scan our build artifacts for security vulnerabilities and compliance issues, helping us to identify and address potential risks.
- The Deploy to Container : plugin allows us to automate the process of deploying our application to a container, like Tomcat or Docker. This plugin makes it easier for us to integrate containerization into our software delivery process, which can improve the reliability and consistency of our deployments.
- The Snippet Generator : plugin provides a user-friendly way to generate Groovy scripts for our Jenkins pipeline. Groovy is the scripting language used by Jenkins, and this plugin makes it easier for us to write code snippets for common pipeline tasks like setting environment variables or sending notifications. This plugin can save us time and reduce the risk of errors when creating Jenkins pipelines.
Application Used For this project : “Hello-World-Servlet”
To start , we’ll need to open up Jenkins in 8080 port and head to the dashboard. Once we’re there , we can click on the “ New Item” button to create a new project.

Now, we need to give our project a name. Since this is a “Hello-World-Servlet” project, let’s call it “hello-world-servlet-Pipeline”. Once we’ve entered the name, we can select “Pipeline” as the type of project we want to create and click on the “OK” button to continue.
Next, we’ll be taken to the project configuration page. In the “Pipeline” section, select “Pipeline script from SCM” as the definition. Select “Git” as the SCM and enter the repository URL and credentials if necessary. Enter the path to the Jenkins file, which should be the root directory.
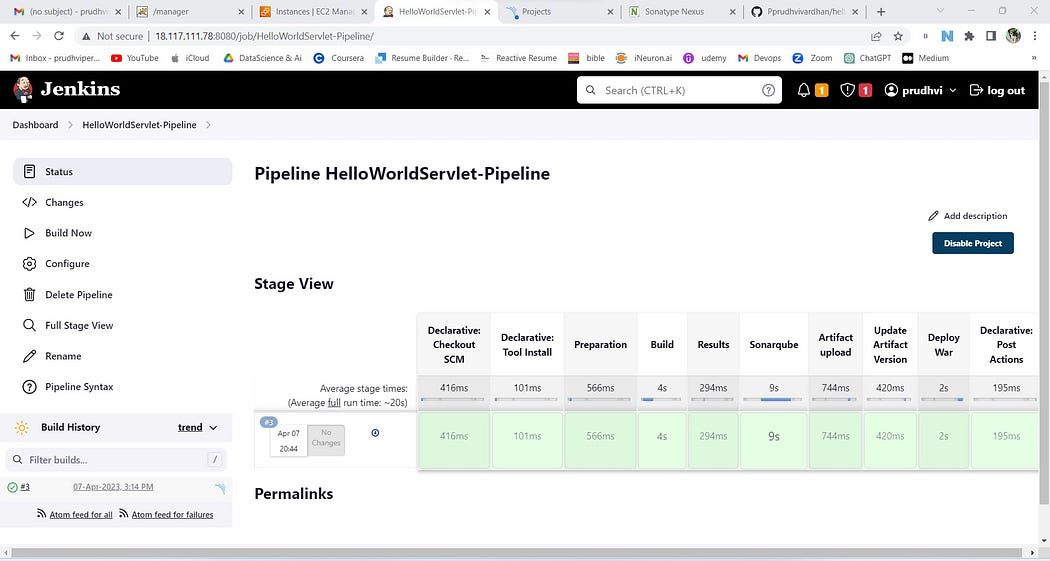
Click “Save” to save your changes. Here, we’ll define the pipeline using Groovy scripts by snippet generator , as we mentioned earlier. We’ll define the different stages of the pipeline, such as checkout, build, test, SonarQube analysis, and deployment to Nexus and Tomcat,Ansible playbook in Jenkins file.
pipeline {
    agent any
    tools {
        maven 'Maven'

    }
stages {

 stage('Preparation') {
     steps {
// for display purposes

      // Get some code from a GitHub repository

      git 'https://github.com/Pprudhvivardhan/hello-world-servlet.git'

      // Get the Maven tool.

 // ** NOTE: This 'M3' Maven tool must be configured

     // **       in the global configuration.
     }
   }

   stage('Build') {
       steps {
       // Run the maven build

      //if (isUnix()) {
         sh 'mvn -Dmaven.test.failure.ignore=true install'
      //}
      //else {
      //   bat(/"${mvnHome}\bin\mvn" -Dmaven.test.failure.ignore clean package/)
       }
//}
   }

  stage('Results') {
      steps {
      junit '**/target/surefire-reports/TEST-*.xml'
      archiveArtifacts 'target/*.war'
      }
 }
 stage('Sonarqube') {
    environment {
        scannerHome = tool 'sonarqube'
    }
    steps {
        withSonarQubeEnv('sonarqube') {
            sh "${scannerHome}/bin/sonar-scanner"
        }
  //      timeout(time: 10, unit: 'MINUTES') {
 //           waitForQualityGate abortPipeline: true
  //      }
    }
}
     stage('Artifact upload') {
      steps {
     //nexusPublisher nexusInstanceId: '1234', nexusRepositoryId: 'releases', packages: [[$class: 'MavenPackage', mavenAssetList: [[classifier: '', extension: '', filePath: 'target/helloworld.war']], mavenCoordinate: [artifactId: 'hello-world-servlet-example', groupId: 'com.geekcap.vmturbo', packaging: 'war', version: '$BUILD_NUMBER']]]
      nexusPublisher nexusInstanceId: '1234', nexusRepositoryId: 'maven-releases', packages: [[$class: 'MavenPackage', mavenAssetList: [[classifier: '', extension: '', filePath: 'target/helloworld.war']], mavenCoordinate: [artifactId: 'hello-world-servlet-example', groupId: 'com.geekcap.vmturbo', packaging: 'war', version: '$BUILD_NUMBER']]]
      }
 }

     stage('Update Artifact Version') {
      steps {
        sh label: '', script: '''sed -i s/artifactversion/$BUILD_NUMBER/ deploy.yml'''
      }
 }
     stage('Deploy War') {
      steps {
        sh label: '', script: 'ansible-playbook deploy.yml'
      }
 }
}
post {
        success {
            mail to:"prudhviperumandla.com", subject:"SUCCESS: ${currentBuild.fullDisplayName}", body: "Build success"
        }
        failure {
            mail to:"prudhviperumandla.com", subject:"FAILURE: ${currentBuild.fullDisplayName}", body: "Build failed"
        }
    }
}
We have included a step for Sonar properties in the Jenkins file, which we have placed in a folder within the Git source code. The folder contains the following components:
sonar.projectKey=HelloWorldServlet-Pipeline
sonar.projectName=HelloWorldServlet-Pipeline
sonar.projectVersion=1.0
sonar.sources=/var/lib/jenkins/workspace/HelloWorldServlet-Pipeline
sonar.java.binaries=/var/lib/jenkins/workspace/HelloWorldServlet-Pipeline/target/classes/
sonar.jacoco.reportPaths=/var/lib/jenkins/workspace/HelloWorldServlet-Pipeline/target/jacoco.exec
sonar.sourceEncoding=UTF-8
And don’t forget about the “deploy.yml” file that consists of Tomcat server configuration!
---
- hosts: webservers
  become: true
  tasks:
  - name: Stop Tomcat
    service: name=tomcat state=stopped
  - name: Check that war file exist
    stat:
      path: /usr/share/tomcat/webapps/hello-world-servlet-example.war
    register: stat_result

  - name: Delete the war file, if it exist already
    file:
      path: /usr/share/tomcat/webapps/hello-world-servlet-example.war
      state: absent
    when: stat_result.stat.exists == True
  - name: Check that Hello-World-Servlet D dir exist
    stat:
      path: /usr/share/tomcat/webapps/hello-world-servlet-example
    register: stat_result
  - name: Delete the Hello-World-Servlet dir, if it exist already
    file:
      path: /usr/share/tomcat/webapps/hello-world-servlet-example
      state: absent
    when: stat_result.stat.exists == True
  - name: Deploy War File
    get_url:
       url: http://14.178.82.156:8081/service/rest/v1/search/assets/download?sort=version&repository=maven-releases&maven.groupId=com.geekcap.vmturbo&maven.artifactId=hello-world-servlet-example&maven.baseVersion=4&maven.extension=war
       dest: /usr/share/tomcat/webapps/hello-world-servlet-example.war
  - name: Start Tomcat
    service: name=tomcat state=started
In this Deploy. yml , we’re using a few key steps, Firstly , we need to stop the server and clean up any existing content . Then, we deploy the latest code and make sure to mention the Nexus instance in the code . Finally , We start up the Tomcat service to ensure everything is running smoothly.
By configuring a pipeline in Jenkins, we can automate the build .

The actual build process begins, which may involve compiling the source code, running unit tests, and generating build artifacts. Once the build process is complete, the pipeline publishes the build artifacts to a repository, such as Nexus. These artifacts can then be used for deployment or future builds.
Finally, the pipeline deploys the application to the target environment, such as a staging or production server.
Thank you for reading this blog post! I hope you found the information helpful and informative. If you have any questions or comments, please feel free to leave them below. Your feedback is always appreciated.