The entire network architecture of any cloud-based service is based on Virtual Private Cloud. AWS VPCs offer the required network segregation and enable security by efficiently managing aspects like subnets, routing, firewalls, DHCP, etc.
Cloud network design and architecture is a vast field and requires knowledge about networking. However, thanks to the abstractions provided by AWS, we don’t have to dig deep into the internal workings of networking devices.
In this post, we discuss how to develop a basic AWS VPC using Terraform.
AWS VPC

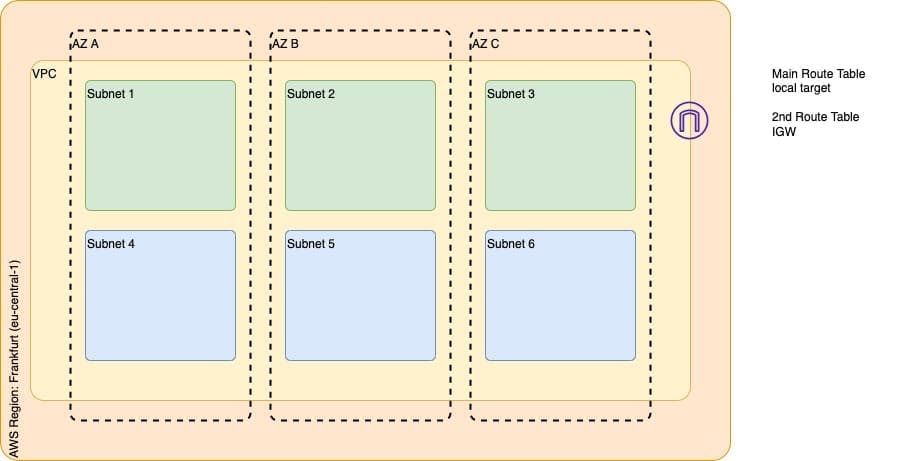
There are several considerations to be made while building a VPC for any project. Let us start to build our VPC from ground up using Terraform. The image above represents a basic target VPC design that consists of the following components.
- VPC in eu-central-1 zone
- 1 Internet Gateway
- 3 Public Subnets, one in each AZ
- 3 Private Subnets, one in each AZ
- Route Table configurations (main and 2nd)
A VPC spans across all the Availability Zones (AZ) in a region. It is always associated with a CIDR range (both IPv4 and IPv6) which defines the number of internal network addresses which may be used internally.
Within the VPC, we create Subnets that are specific to AZs. It is possible to have multiple subnets in the same AZ. The purpose of Subnets is to internally segregate resources contained in the VPC in every AZ. AWS Regions consist of multiple Availability Zones for DR purposes.
When a VPC is created, a corresponding Route Table is also created, which defines a default route that lets the components in the VPC communicate with each other internally. The route table thus created is called the main route table.
Our architecture contains two types of subnets – public and private. Public subnets enable internet access for the components hosted within them, while private subnets don’t. Routes in the route tables drive the decision to enable or disable internet access. When a subnet is associated with a route table that allows internet access, it is called a public subnet. Whereas the subnet associated with the route table that does not allow internet access is called private subnets.
An Internet Gateway is deployed and associated with the VPC to enable internet traffic within the VPC’s public subnets. Only one Internet Gateway can be associated with each VPC. Owing to this, and the fact that there is usually a default internet address (0.0.0.0/0) pointing to Internet Gateway, as a best practice, it is recommended to create a second route table.
Thus apart from the main route table, our architecture consists of a second route table to which Public subnets are explicitly associated. With this as the background, let us start building this VPC design from scratch.
Step 1: Create a VPC
To begin with, let us start by defining our VPC resource in Terraform. To specify a range of IP addresses in a VPC, a CIDR block needs to be provided. We have also provided a Name tag for identification.
resource "aws_vpc" "main" {
cidr_block = "10.0.0.0/16"
tags = {
Name = "Project VPC"
}
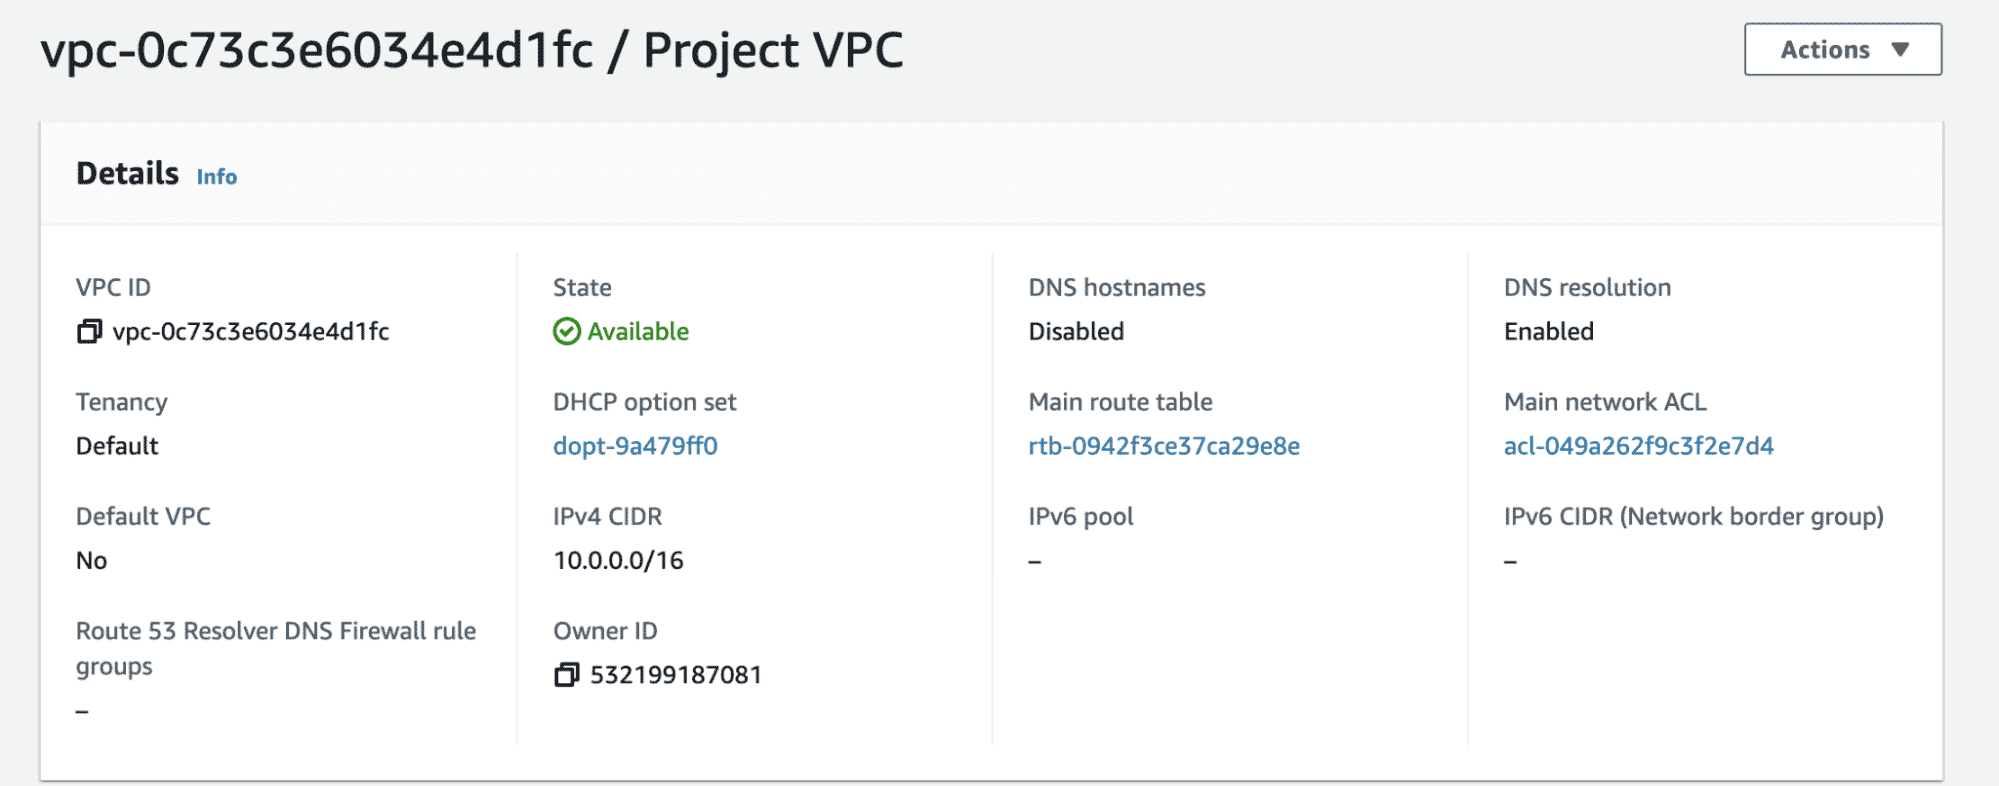
}Just by applying this configuration, since we are creating a VPC – a main Route table, and main Network ACL is also created. The VPC is also associated with a pre-existing DHCP option set, as shown in the below screenshot. We will take note of this as we would need this information later.
Step 2: Create Subnets
VPC exists across all the Availability Zones in a region. While Subnets are associated with a single AZ. The Frankfurt (eu-central-1) region has three AZs, and we need one public and one private subnet in each AZ as per the diagram.
Firstly, we identify the CIDR ranges to be associated with the six new subnets we need to create. In our example, based on the CIDR range of the VPC I have identified the CIDR ranges and defined a couple of variables in our Terraform code (variables.tf).
variable "public_subnet_cidrs" {
 type        = list(string)
 description = "Public Subnet CIDR values"
 default     = ["10.0.1.0/24", "10.0.2.0/24", "10.0.3.0/24"]
}

variable "private_subnet_cidrs" {
 type        = list(string)
 description = "Private Subnet CIDR values"
 default     = ["10.0.4.0/24", "10.0.5.0/24", "10.0.6.0/24"]
}
The above variables define a list of strings that essentially hold the CIDR ranges for each subnet. The two variables represent different lists of CIDR ranges for public and private subnets.
Back into our main.tf file, it is now time to write the configuration for subnets. The resource blocks below define the required public and private subnets.
resource "aws_subnet" "public_subnets" {
 count      = length(var.public_subnet_cidrs)
 vpc_id     = aws_vpc.main.id
 cidr_block = element(var.public_subnet_cidrs, count.index)

 tags = {
   Name = "Public Subnet ${count.index + 1}"
 }
}

resource "aws_subnet" "private_subnets" {
 count      = length(var.private_subnet_cidrs)
 vpc_id     = aws_vpc.main.id
 cidr_block = element(var.private_subnet_cidrs, count.index)

 tags = {
   Name = "Private Subnet ${count.index + 1}"
 }
}
Creating separate resource blocks for public and private subnets gives us the flexibility to manage them in Terraform IaC. Since we have subnet CIDRs in the form of a list of strings, we have leveraged the length property to create a corresponding number of subnets. Let us apply this configuration and verify the same.
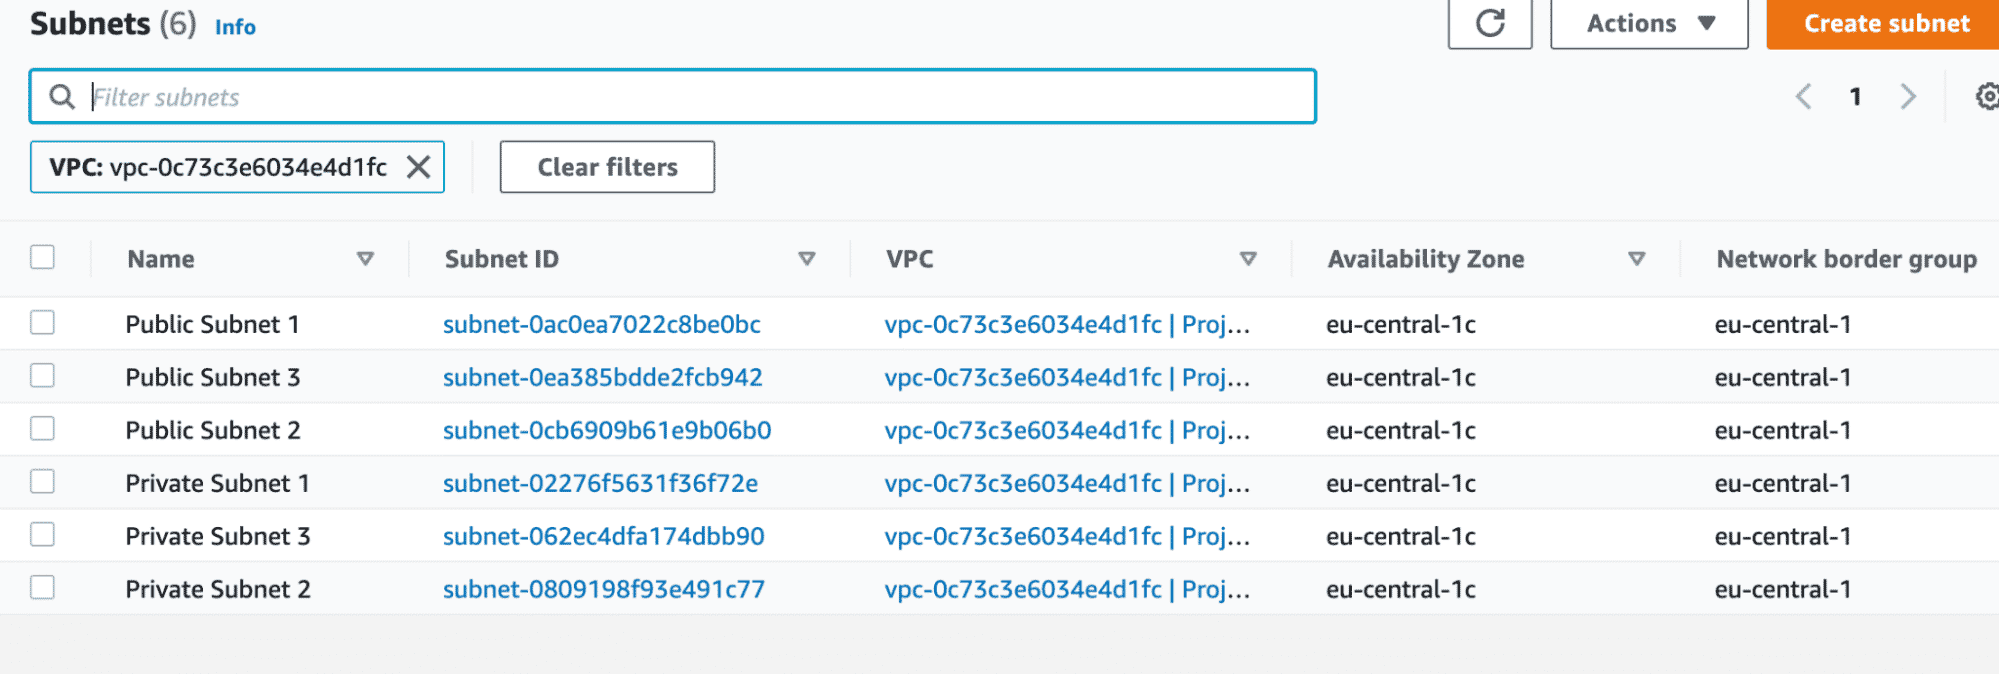
As we can see from the above screenshot, we have successfully created six subnets (three private and three public). However, all of them are placed in the same Availability zone. This is not as per the requirement represented in the diagram.
To tackle this situation, we create another variable to store the list of availability zones as below.
variable "azs" {
 type        = list(string)
 description = "Availability Zones"
 default     = ["eu-central-1a", "eu-central-1b", "eu-central-1c"]
}
In our subnet resource blocks, we use this variable to map each public and private subnet across these availability zones, as shown below.
resource "aws_subnet" "public_subnets" {
 count             = length(var.public_subnet_cidrs)
 vpc_id            = aws_vpc.main.id
 cidr_block        = element(var.public_subnet_cidrs, count.index)
 availability_zone = element(var.azs, count.index)

 tags = {
   Name = "Public Subnet ${count.index + 1}"
 }
}

resource "aws_subnet" "private_subnets" {
 count             = length(var.private_subnet_cidrs)
 vpc_id            = aws_vpc.main.id
 cidr_block        = element(var.private_subnet_cidrs, count.index)
 availability_zone = element(var.azs, count.index)

 tags = {
   Name = "Private Subnet ${count.index + 1}"
 }
}
Apply this configuration and verify the same.
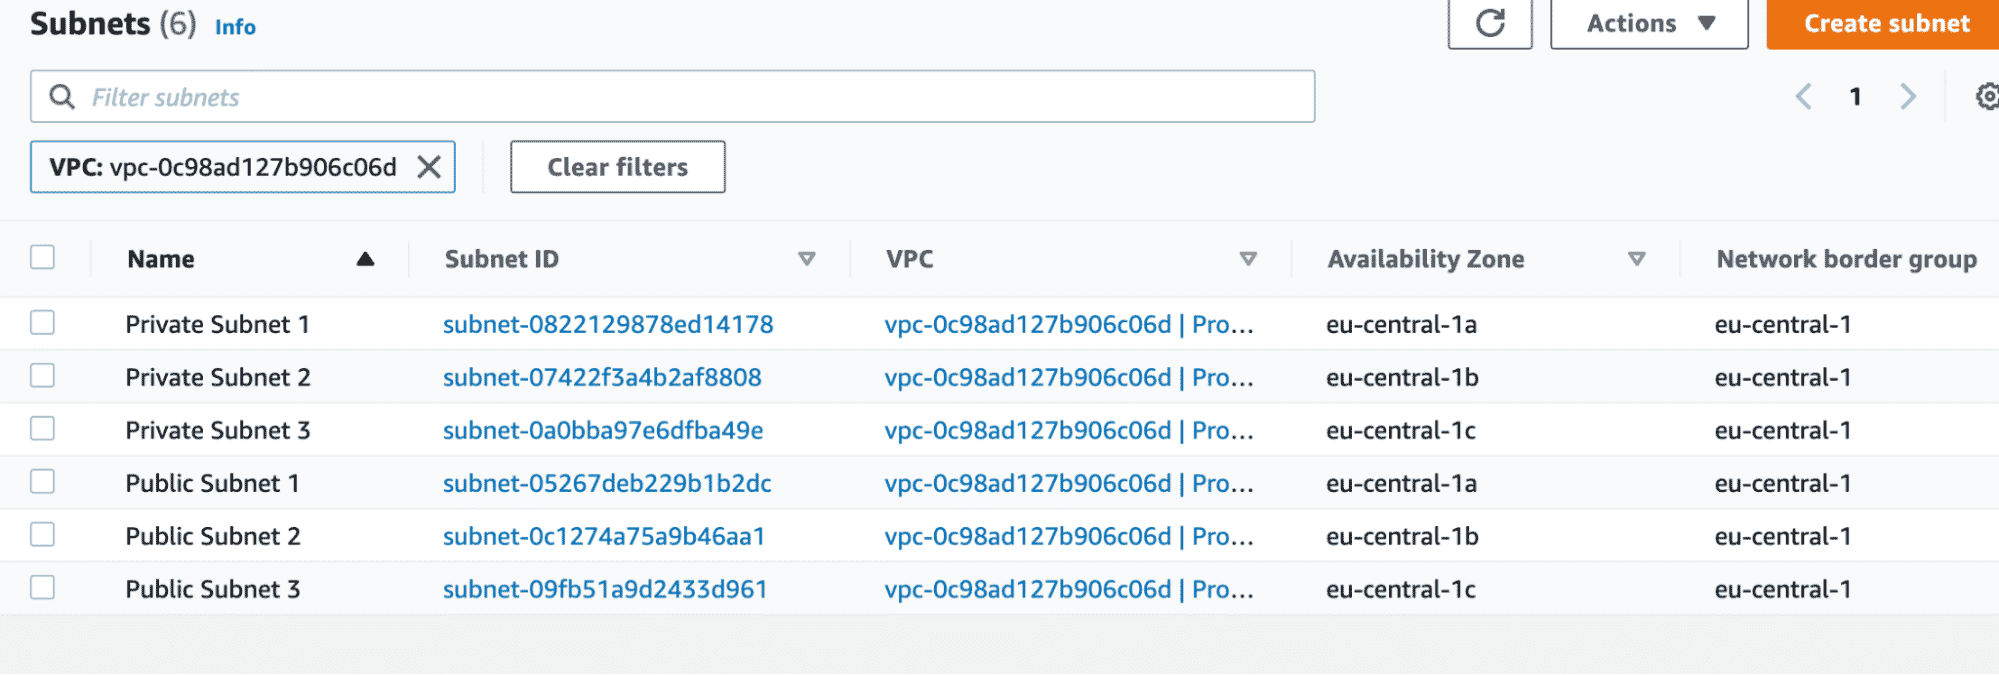
As you can see from the above screenshot, the subnets are now spread across all the availability zones evenly.
Please note that I have rebuilt the VPC, but even if you apply the AZ changes on the existing configuration, you would see a similar output shown above.
💡 You might also like:
- How to Scale Terraform Deployments with GitHub Actions
- Automating Infrastructure Deployments Using Terraform
- Infrastructure Drift Detection and How to Fix It
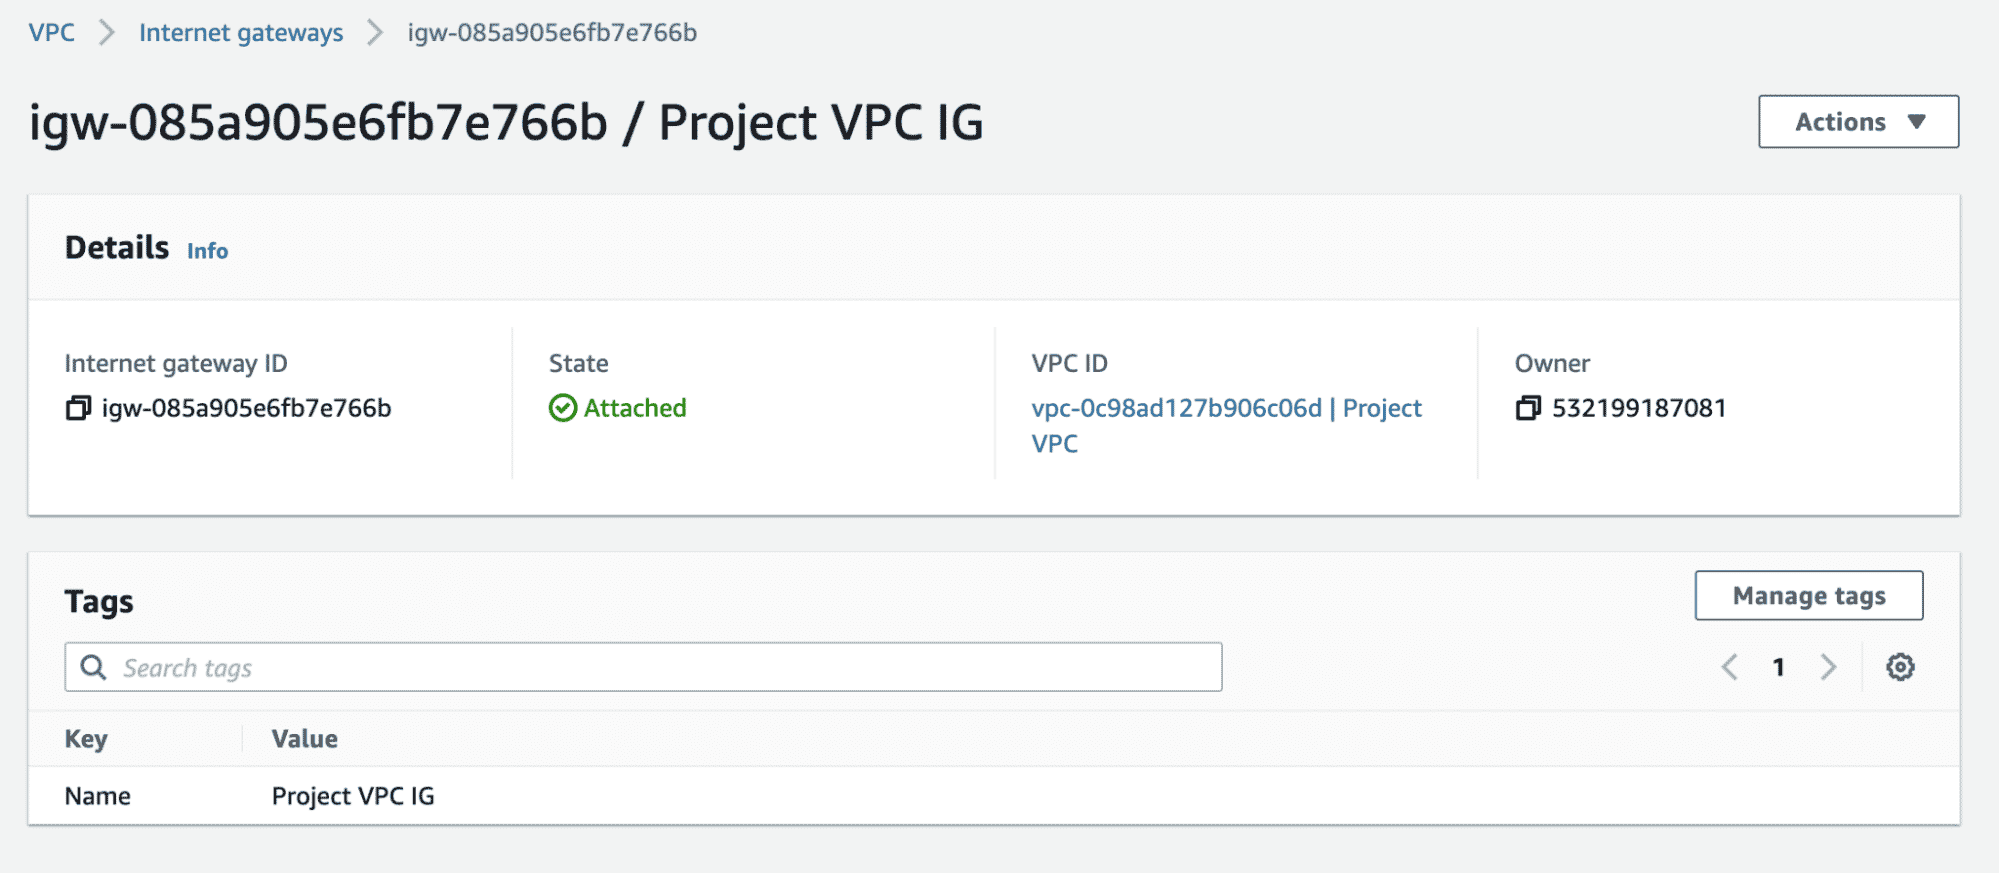
Step 3: Internet Gateway
Since we have to build public subnets, we need to provide access to the internet in the given VPC. For this, the first thing that we need is an Internet Gateway. The resource block below is the simplest way to create an Internet Gateway.
resource "aws_internet_gateway" "gw" {
 vpc_id = aws_vpc.main.id

 tags = {
   Name = "Project VPC IG"
 }
}
We have already associated this IG with the VPC we created before by specifying the VPC id attribute. Apply this configuration and verify the same.
Step 4: Create a 2nd Route Table
We already know that when a VPC is created, a main route table is created as well. The main route table is responsible for enabling the flow of traffic within the VPC.
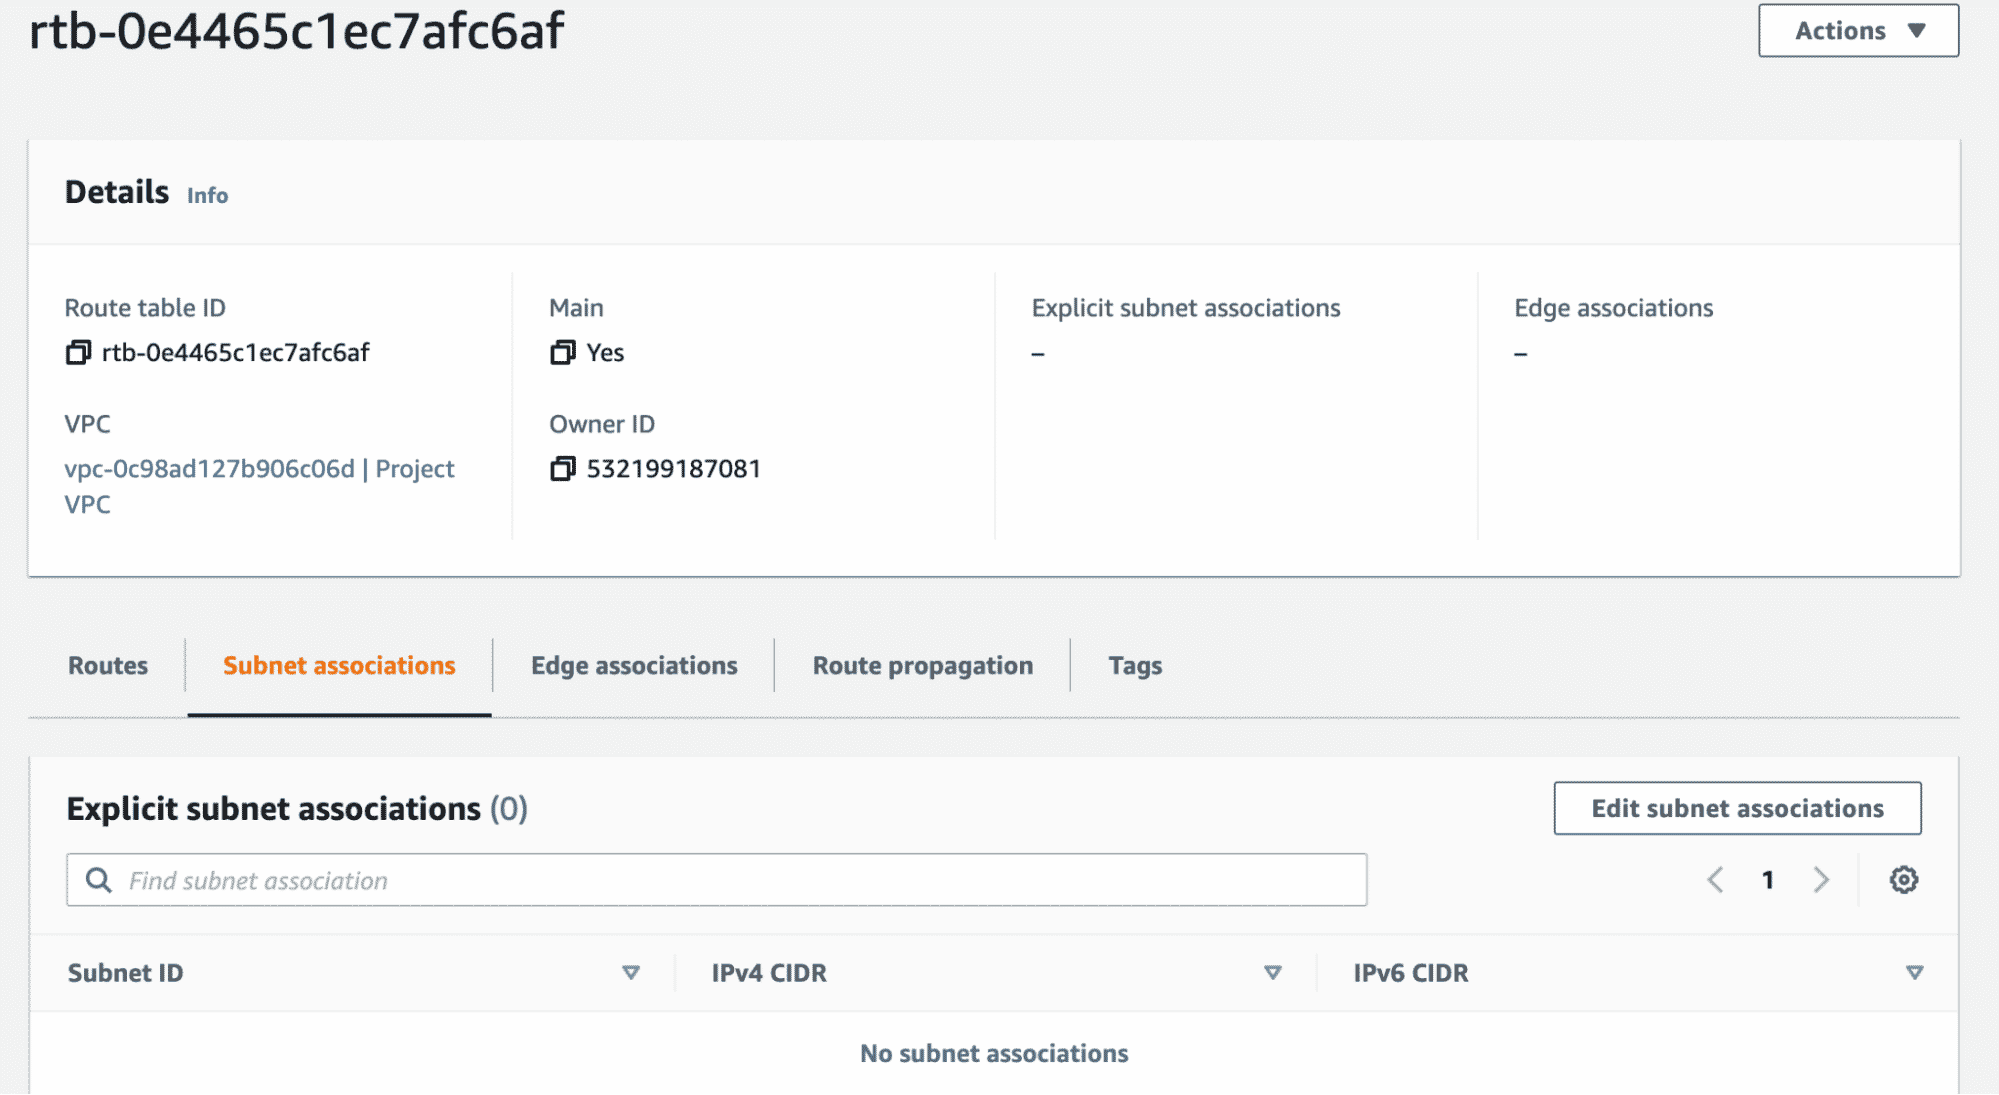
The screenshot above shows the main route table and that there is no explicit association of any subnet to this route table. However, if you scroll down, all the subnets are associated implicitly. This is the default setting.
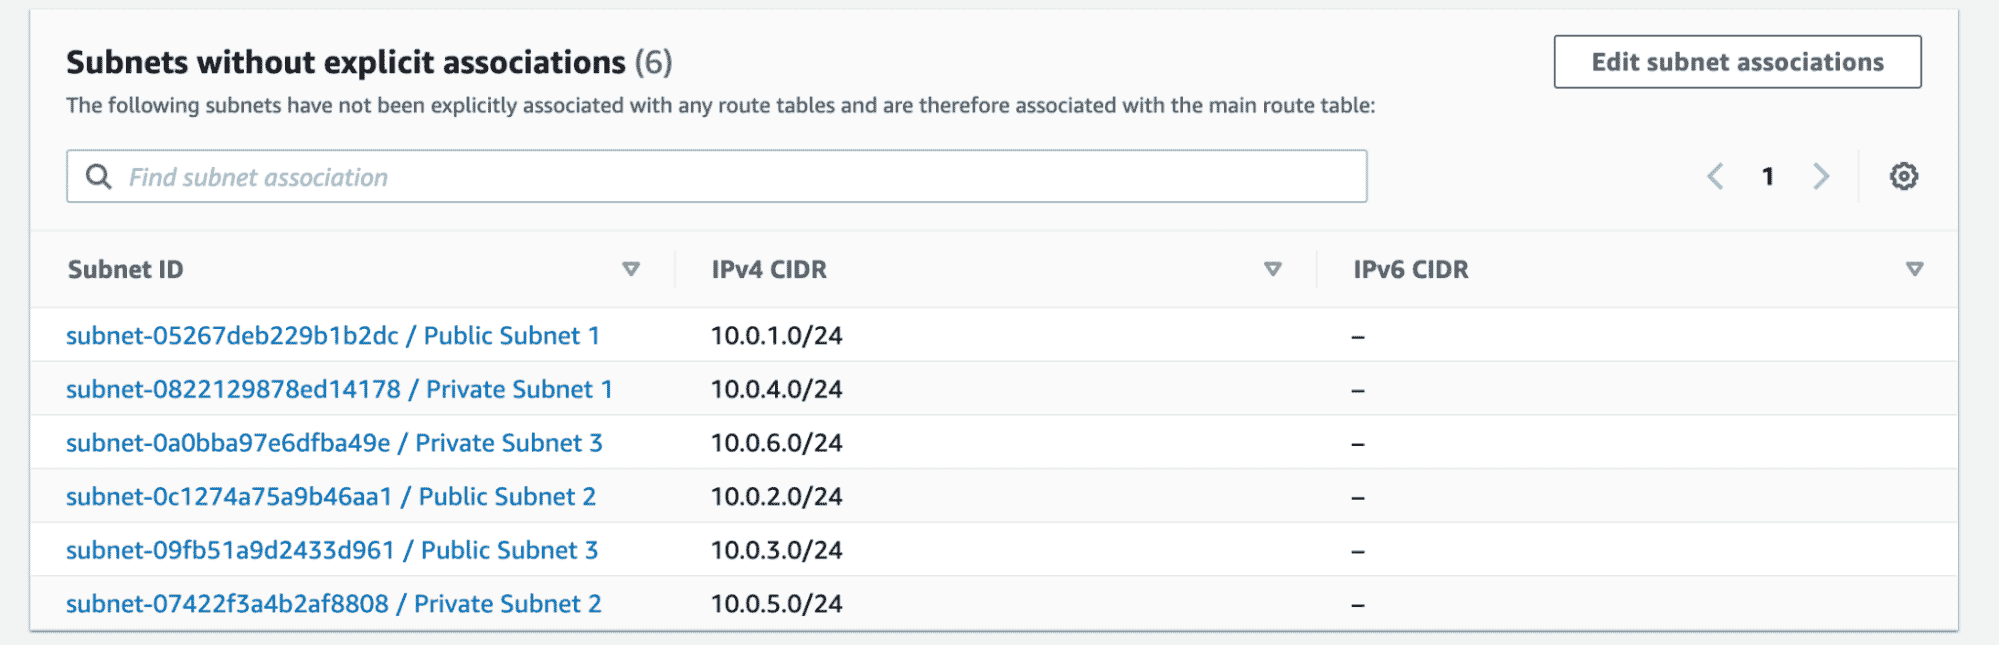
At this moment, even though the subnets are called Public and Private, they are all private. To make the subnets named “Public” public, we have to create routes using IGW which will enable the traffic from the Internet to access these subnets.
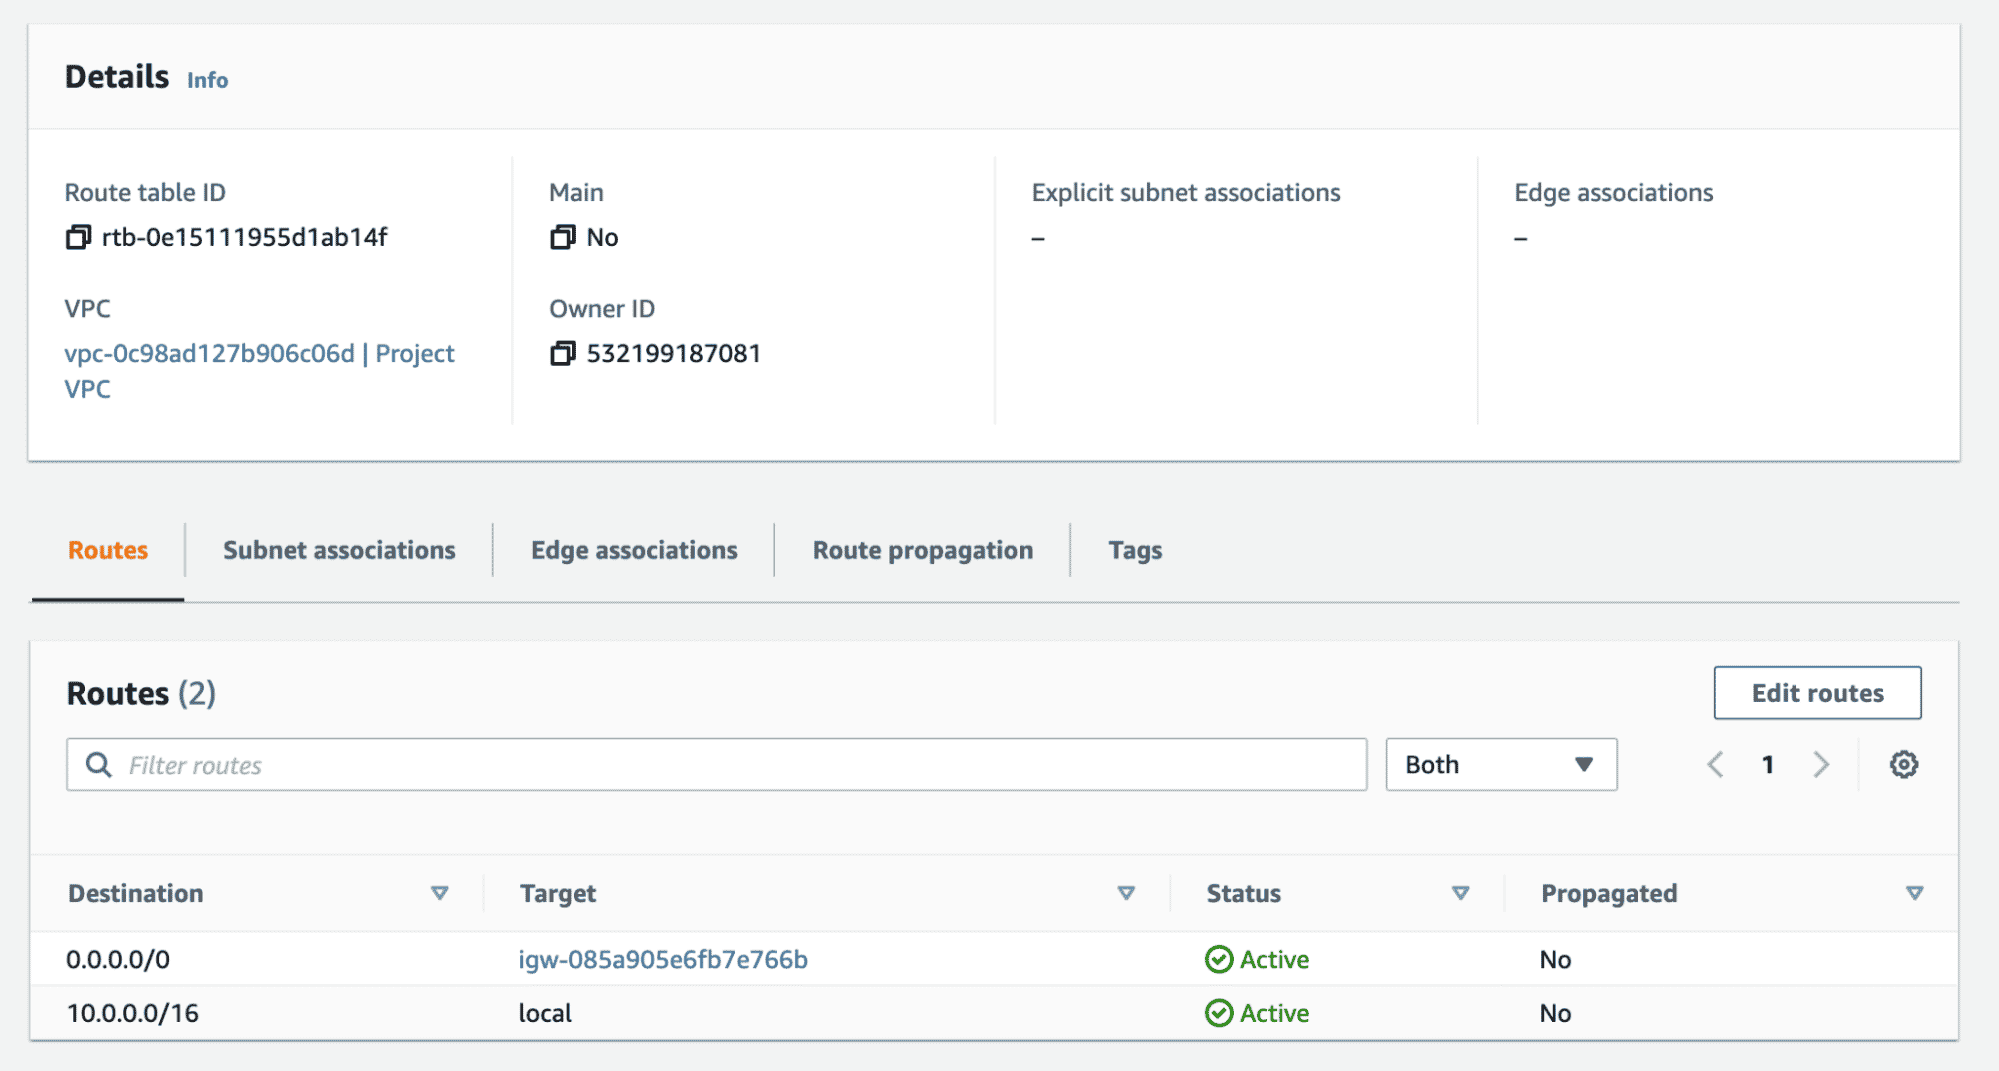
As a best practice, we create a Second route table and associate it with the same VPC as shown in the below resource block. Note that we have also specified the route to the internet (0.0.0.0/0) using our IGW.
resource "aws_route_table" "second_rt" {
 vpc_id = aws_vpc.main.id

 route {
   cidr_block = "0.0.0.0/0"
   gateway_id = aws_internet_gateway.gw.id
 }

 tags = {
   Name = "2nd Route Table"
 }
}
Verify the creation of the second route table as below and the note the route that enables Internet traffic.
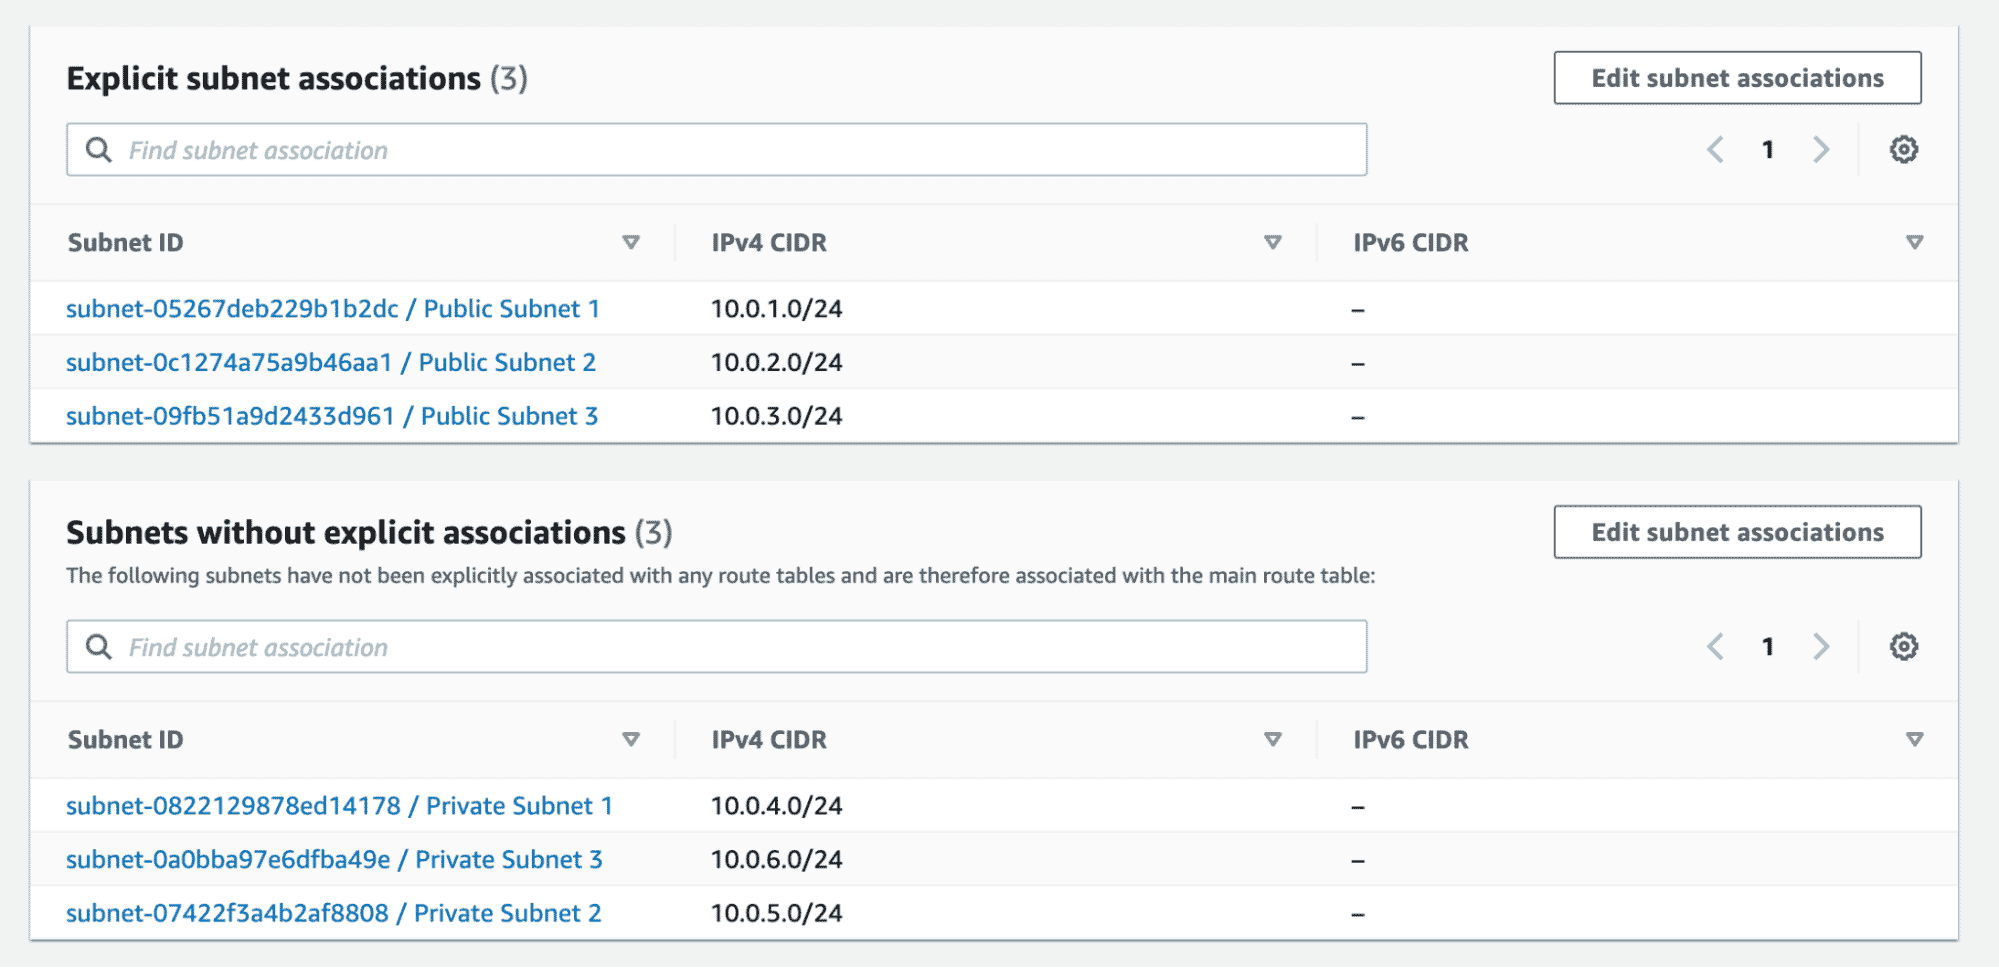
Step 5: Associating Public Subnets to the Second Route Table
If we take a look at subnet associations for the second route table, it would look similar to the main route table. None of the subnets are explicitly associated in the second route table as well. In this situation, subnets follow the main route table.
We have to explicitly associate all the public subnets with the second route table to enable internet access on them. Add the Terraform configuration resource block below to do the same.
resource "aws_route_table_association" "public_subnet_asso" {
 count = length(var.public_subnet_cidrs)
 subnet_id      = element(aws_subnet.public_subnets[*].id, count.index)
 route_table_id = aws_route_table.second_rt.id
}
Here, we again rely on the length property of the public_subnet_cidrs variable to create the associations. Since we have three public subnets in our design, this configuration would create three corresponding associations of subnets and the second route table. Apply this configuration and verify the same.
As we can see from the above screenshot, we have successfully explicitly associated public subnets with the second route table, which has a route to the internet via the IGW.
If we now take a look at our main route table, the public subnet association is automatically removed.
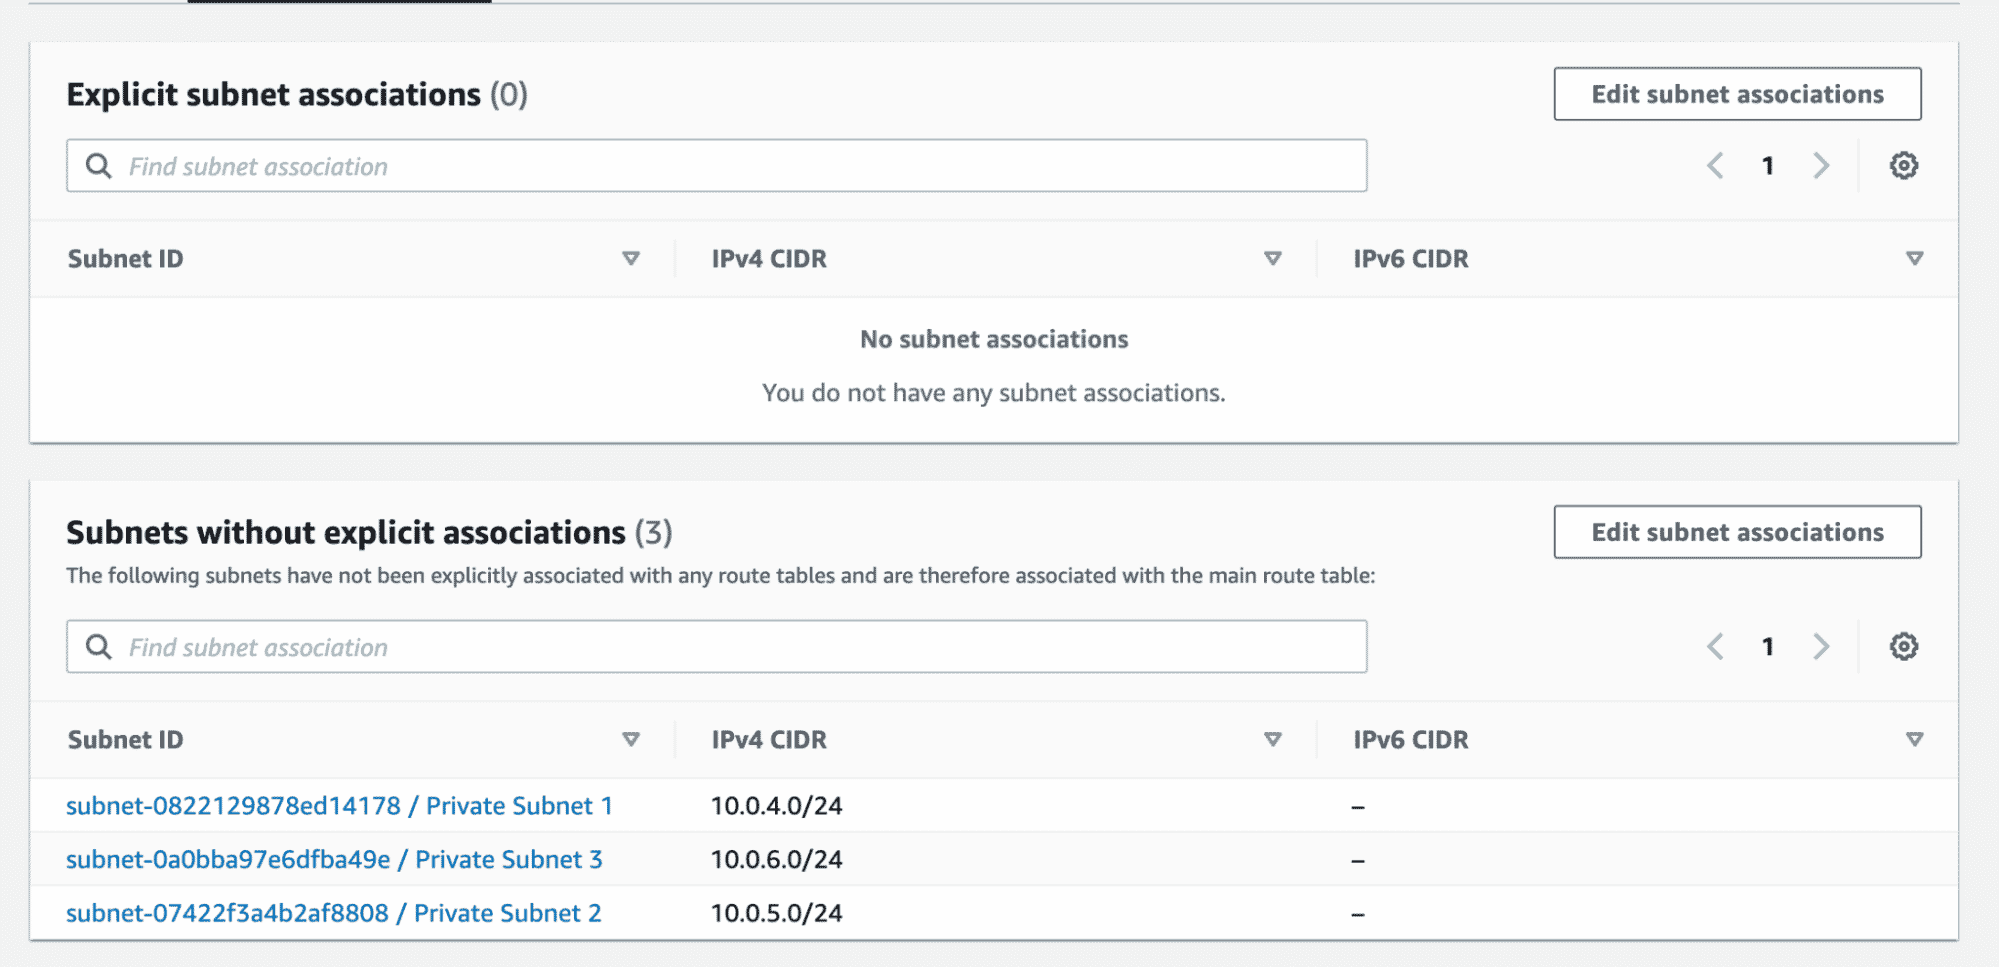
We have now successfully implemented the VPC design represented in the diagram using Terraform. There are more properties that can be configured using Terraform, like – VPC endpoints, network ACLs, DHCP options, etc. By following the steps above, I hope to have given you a good starting point to build upon.
Using Certified Terraform VPC Module
If you are looking for a quick way to create and manage VPC in AWS, it is always possible to leverage existing Terraform Modules that will help build the VPC and various associated attributes.
Modules are a great way to leverage best practices as well as to save time by avoiding reinventing the wheel. Let us take a look at this certified Terraform AWS VPC module. Modules are contributed or sponsored and published in the Terraform registry, and it has good support in terms of documentation.

To create a “complete-vpc” example, all we need to write in the main.tf file is this:
module "vpc_example_complete-vpc" {
 source  = "terraform-aws-modules/vpc/aws//examples/complete-vpc"
 version = "3.14.2"
}
This example VPC module automatically creates 74 different components of AWS VPC automatically.
Of course, it is not so straightforward! We did not specify any CIDR ranges amongst other things, so what kind of selection was made? We worked with an example in the above snippet. To use the VPC module properly, there are quite a few inputs defined that are used to supply desired values.
Examples are a great way to get to know the published modules and analyze how well they suit our requirements. Refer to the documentation of the VPC module to identify and use the inputs available to define the desired CIDR ranges.
Conclusion
We have covered a couple of ways to create and manage AWS VPCs – building them from scratch and using certified, published modules.
Certified published modules may save time initially, but as the project and product requirement grows, it would make more sense to build a VPC from scratch which has all the specifics covered.