Introduction
In this tutorial, we are going to examine Jenkins and what its purpose is. We will begin by installing it on an Ubuntu 20.04 server and then start the software, enable the service, configure it, and finally, create a user with administrative privileges.
What is Jenkins?
Jenkins is an open-source program written in the Java programming language. It is designed to provide stable and balanced Continuous Integration and Continuous Deployment (CI/CD) processes.
Why is it Needed?
Let’s try to understand why this type of software is needed. Previously, when programmers wrote code and created applications, the next steps were to:
- Build a cross-platform application that can be utilized on and transferred to any server.
- Perform the necessary performance testing and evaluation.
- Transfer, install, and configure the application on the servers.
These are just some of the tasks that Jenkins solves. These steps can now be automated to stabilize and speed up the development process while reducing human error. Because of this, Jenkins is one of the most widely used CI/CD solutions in use today.
Advantages
Jenkins is famous for such advantages as:
- Increasing the reliability of the CI/CD process.
- Ease of installation, configuration, and usage of the software.
- A wide variety of Plugins which extends its capabilities.
- Integration with other CI/CD tools.
- Distribution of services. A developer can build, test, and deploy applications across multiple servers and platforms.
- Being a free and open-source application.
Prerequisites
To install Jenkins on Ubuntu 20.04, the following requirements must be met.
- A server with at least 2 GB RAM and 2 cores.
- The Ubuntu 20.04 OS installed.
- All commands are executed as the root user. If you are a normal user, you must have access to and use the sudo command.
Installation
First, we should always update Ubuntu and all installed applications.
sudo apt update && apt upgrade -y
Install JDK
In order to install, configure, and use Jenkins, we need the Java Development Kit (JDK) installed. This tutorial will use JDK version 11 since Jenkins can use both JDK 8 and 11 versions by default. Let’s begin by installing the latest version of the JDK software.
First, we check if we already have the JDK software installed on the server using the version command.
java -version
-bash: java: command not found
Now we can install the JDK.
sudo apt install openjdk-11-jdk -y
Verify Java Version.
Lastly, we verify the Java version using this command.
java -version
Install Jenkins
Next, we install Jenkins itself. The Jenkins version contained in the standard Ubuntu packages is different from the latest available version. Therefore, we will install the newest version from the official site.
First, we add the gpg key to verify the authenticity of the software from the repository.
sudo -i
wget -q -O – https://pkg.jenkins.io/debian/jenkins.io-2023.key | apt-key add –
After this, we add the repository address to our /etc/apt/sources.list.d file. This list contains information on where to download and update the application.
sh -c ‘echo deb https://pkg.jenkins.io/debian-stable binary/ > \ e> /etc/apt/sources.list.d/jenkins.list‘
Next, let’s update our package list again so that the apt package manager can find the software new repository.
apt-get update
Now we can install Jenkins.
apt install jenkins –y
Start and Verify the Service
We have installed Jenkins. Now we will start it using the systemctl system command.
sudo systemctl start jenkins
Next, we check to see if everything has started correctly using the systemctl status command.
sudo systemctl status jenkins
Here we can see the status
If we are installing in the AWS Ubuntu 20.04 instance
Copy the ip address and add port number 8080 at the end
Example : 65.0.74.227:8080 in the url
Here we need to enter the password. To obtain the password, run the following command in the terminal to locate the password that is stored in the initialAdminPassword file.
cat /var/lib/jenkins/secrets/initialAdminPassword
Copy that password that the command output received in the terminal, and enter it in the Administrator password window below and click continue.
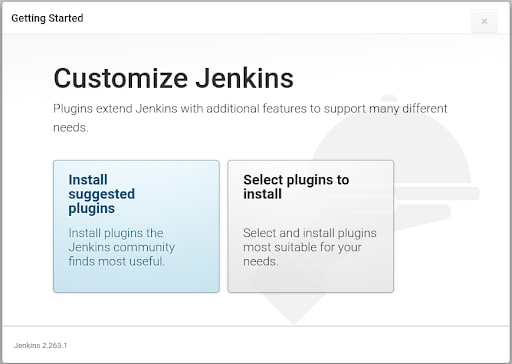
The next screen displays the plugins that are recommended for installation, and provides the option to select and install those plugins.
In this case, we will install the suggested plugins. After this, the recommended plugins will be installed.
After the installation is complete, you will be prompted to create a user. If you wish, you can skip this step and continue working as an administrator. Here, we will create a user.
In these fields, enter the user details.
Next, click the Save and Continue button.
Now, click the ‘Start using Jenkins’ button and the Jenkins dashboard will open.